Last week, we covered proper sitting posture at desk. This week, we dive into how to correctly type at a desk in order to prevent strains, stress and damage of joints caused by typing. About 95% of an office worker’s day is spent in front of the computer, typing and using the mouse. These seemingly innocent gestures when done thousands of times a day are precisely what lead to disabilities, such as carpal tunnel or repetitive strain injury. You may not realize that your wrists are in the wrong position until you start experiencing wrist pain. According to experts, the ideal typing posture is when the keyboard is below your elbow height when seated, with your wrists straights and not planted on the surface of the desk. Here are the key steps to achieving the most ergonomic and comfortable typing position:
- Place keyboard just below elbow level
- Elbows should be at 90-110 degrees to allow forearms and shoulders to be relaxed
- Keyboard should be flat on the desk or with a slight negative tilt
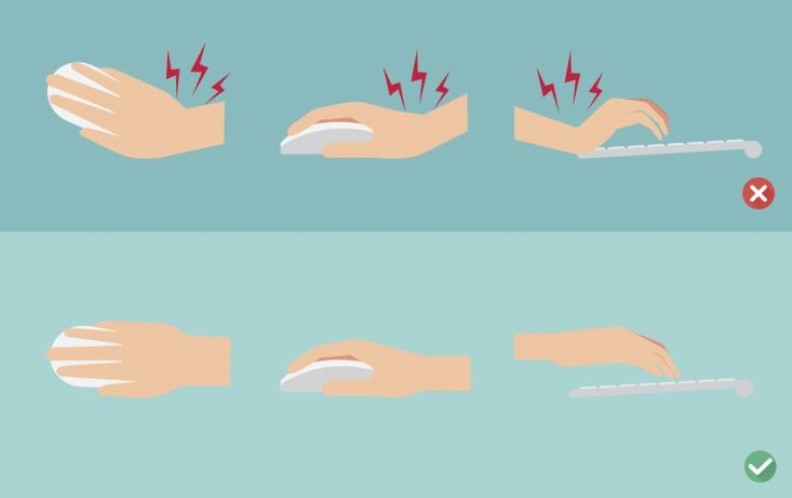
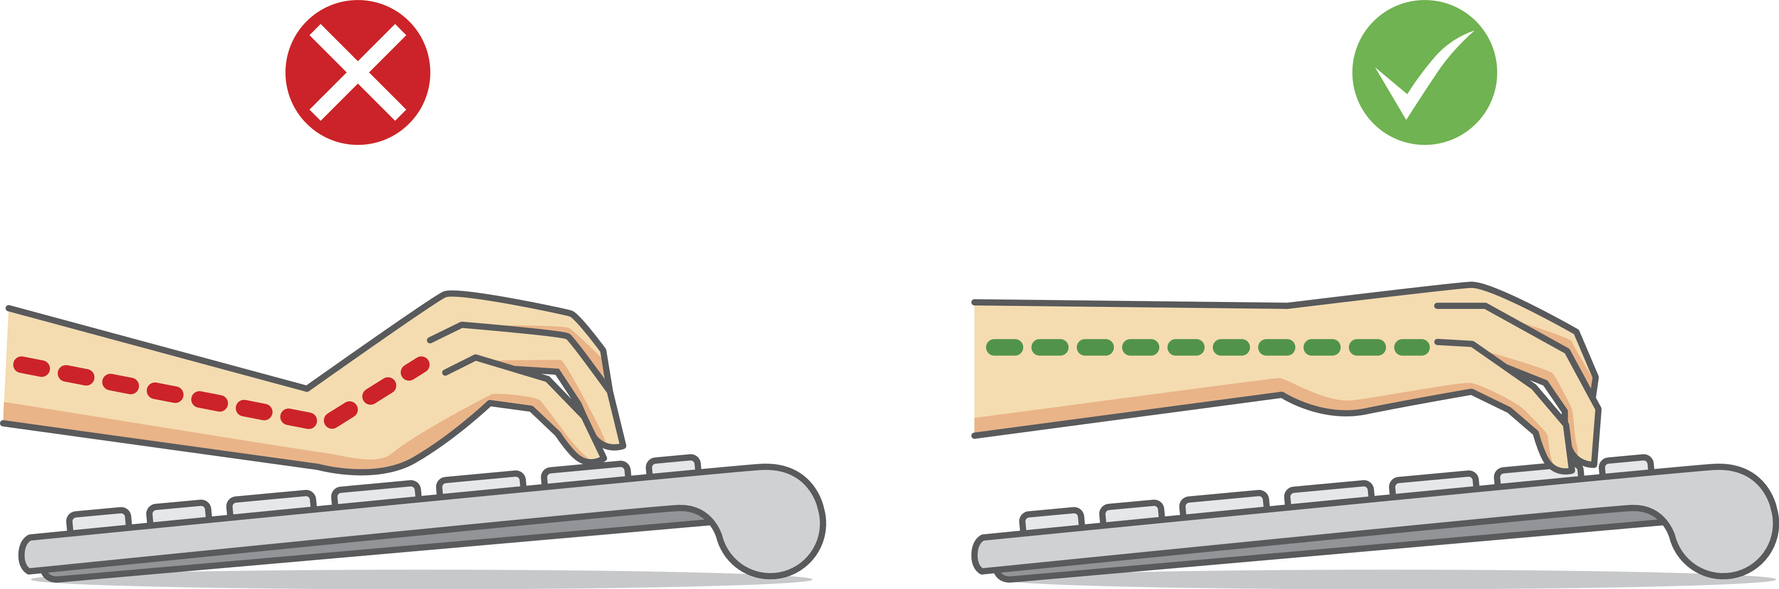
- Keep your wrists straight
- Resist resting your wrists on the desk because it puts pressure on your tendons and cuts off blood circulation
- Keep both feet flat on the floor or use a footrest if needed
- If you use a wrist pad, push it flush against the keyboard, and only use it to support your palms, not your wrists
Wrist Pads – Good or Bad?
Wrist pads are fine, but are much better ergonomically when used as palm rests. Keep these following practices in mind if you’re going to use one:
- Move the wrist pad flush against your keyboard and use it to cushions your palms, not your wrists. This reduces the likelihood of a wrist extension and restriction of blood flow to the wrists.
- When typing, your hands should be hovering just above and not actually resting on the wrist pad. Wrists should be a in a neutrally straight position, so you can draw a straight line from the hands to the wrist.
- Use the wrist pad only in between typing breaks and occasionally as needed.


Ergonomic Typing on the Laptop
Laptops present unique challenges when it comes to ergonomic typing since the keyboards are typically cramped, forcing you shoulder to rotate internally and your wrists to be twisted horizontally. Here are two things you can do to improve your comfort:
- Use an External Keyboard
An external keyboard allows you to maintain optimal distance from your laptop screen – an arm’s length away. Not to mention, regular external keyboards are full size making them more comfortable than most laptops. You can also choose to get an ergonomic keyboard with a split design and tenting to further open up your shoulders and put your wrists and arms in a more neutral position when typing.
a - Use a Laptop Tray (or Stack of Books)
Your computer screen should be positioned so that the top line of the screen is at or slightly below eye level. This is to keep your neck in a neutral position. When you have to look upwards or downwards to see the screen, it increases the level of strain placed on the neck and can lead to neck and back pain. The average head weighs 12 pounds in an upright angle, but can double in weight with just a 15 degree forward incline in the neck, a common position for people working on laptops.
The best way to achieve ergonomic typing is to get a laptop tray that elevates your entire laptop to eye level. Then, use an external keyboard so you’re not reaching up and flexing your wrists to type.
Mouse Movement
Using proper mouse movement is also important in order to reduce the risk of injury and discomfort. Rather than dragging your wrist, move the mouse with whole arm movements that originate at the shoulder. Look for a mouse that is designed to keep your wrist off the desk, preventing compression. Options can include a larger mouse that supports your whole hand so you are not resting on the desk surface or an angled mouse, which rotates your wrist so that you are resting on bone instead of the soft palmar side of your wrist.
Other Ergonomic Typing Tips
- Rest Your Fingers on the Home Keys
The position of your fingers as you type is just as important as the position of your wrists and palms. Ideally, each of your fingers should be resting on a specific key in the home row of the keyboard. The home keys on a standard QWERTY keyboard layout are A,S,D,F and J,K,L,;. The thumbs should be resting on the space bar.
a - Consider a Different Keyboard Layout
You may want to experiment with a different keyboard layout from the standard if you are constantly suffering from hand or fingers strain when typing. The Dvorak Simplified Keyboard layout focuses on reducing muscle strains and improving typing accuracy. In this layout, the home row contains 70% of the most commonly used letters (A,O,E,U,I and H,T,N,S). This configuration dramatically reduces the travel distance of fingers when typing, which reduces repetitive strain injury and greatly speeds up typing.
 a
a - Try a Mechanical Keyboard
Keys on a mechanical keyboard consist of physical switches that are much more tactile and lower restraint compared to those found on membrane keyboards. As a result, they require less energy to depress and register, are much more responsive, and provide tactile and audio feedback that better facilitates touch typing.
The main takeaway is that you always want to maintain a straight, neutral wrist position whether you are typing or using the mouse. Constant flexion or extension of the wrists will lead to strain. Follow these tips for optimal comfort and reduction of repetitive strain injury.


-Paulina Le
Health Fitness Specialist
Sources:
- https://www.goldtouch.com/proper-typing-posture/
- https://uncagedergonomics.com/blog/proper-posture-how-to-improve-wrist-discomfort-and-health-when-typing/